
🎉 Introduction
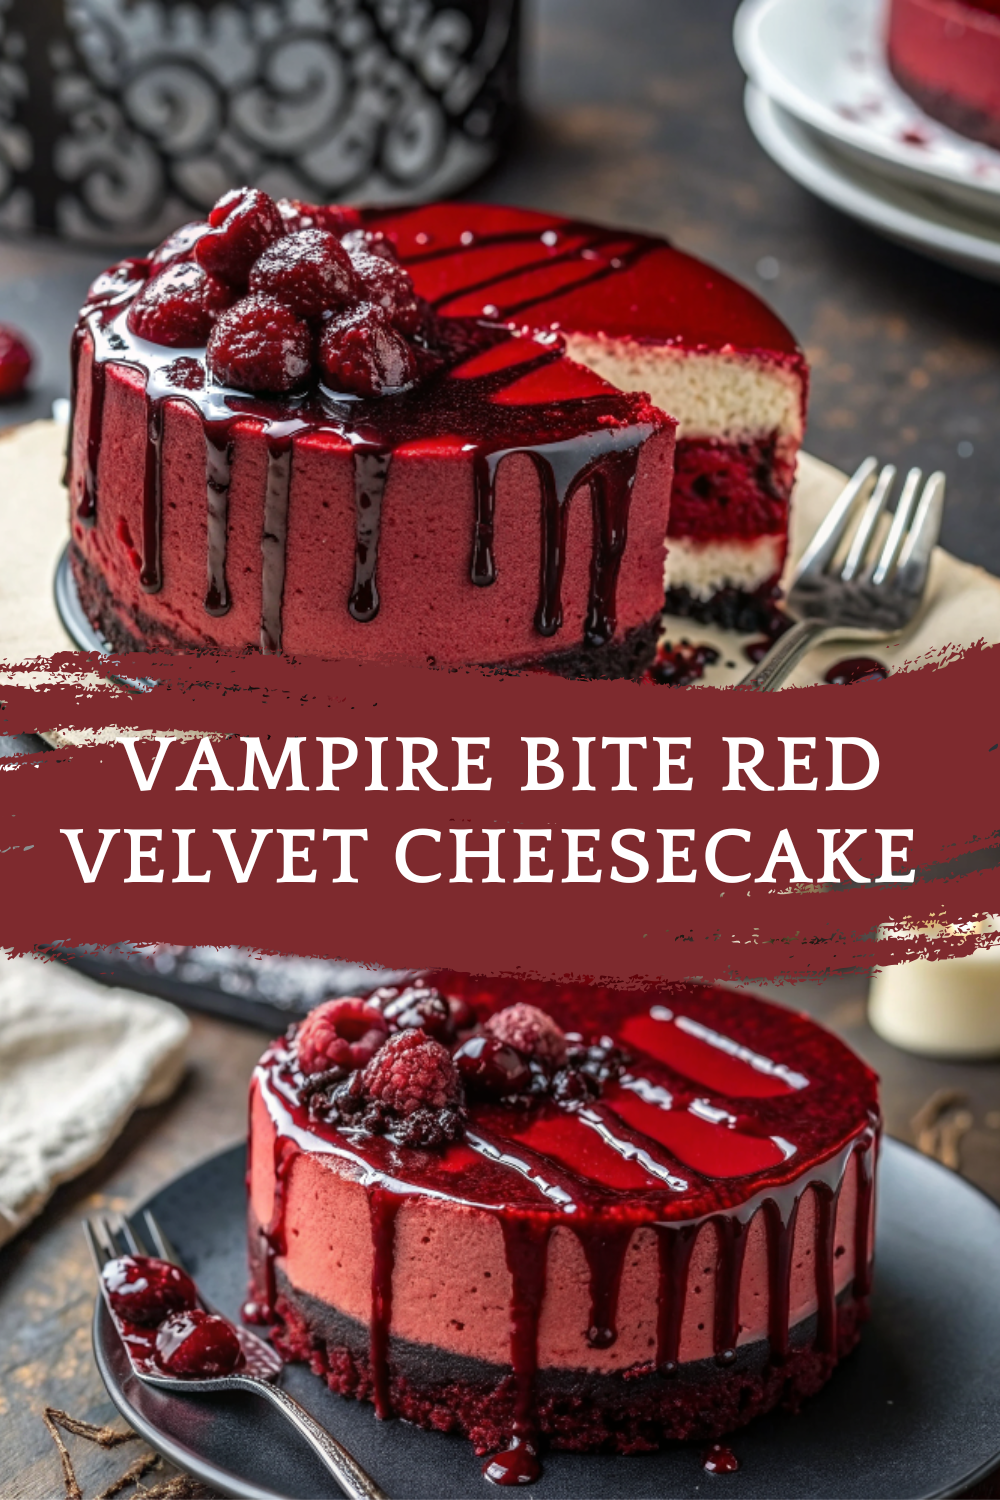
Sink your fangs into something decadent, dramatic, and absolutely unforgettable this Halloween. This Vampire Bite Red Velvet Cheesecake is not your average dessert—it’s a creamy, blood-red centerpiece that thrills both the eyes and the taste buds.
With a rich red velvet base, smooth cheesecake layer, and eerie “blood” sauce oozing from mock vampire bites, this dessert is a hauntingly perfect addition to your spooky season table. Ideal for Halloween parties, October birthdays, or themed gatherings, it’s as festive as it is sinfully delicious.
Don’t worry—there’s no alcohol, no pork, and no artificial spooks here. Just wholesome ingredients brought together to create a dessert that’s fun, family-friendly, and show-stoppingly beautiful.
🧰 Equipment Needed
To bring this frightful fantasy to life, gather the following kitchen tools:
- Springform pan (9-inch)
- Mixing bowls (large and medium)
- Electric mixer or hand whisk
- Silicone spatula
- Measuring cups and spoons
- Food-safe toothpick or straw (for vampire “bite” effect)
- Small saucepan (for blood sauce)
- Wire rack for cooling
- Oven
🛒 Ingredients
Let’s get spooky! Here’s what you’ll need to make this deliciously creepy cheesecake:
Red Velvet Crust:
- 1½ cups crushed chocolate cookies or red velvet sandwich cookies
- ¼ cup melted butter
- 1 tbsp unsweetened cocoa powder
- 1 tbsp granulated sugar
Cheesecake Filling:
- 3 (8 oz) packages cream cheese, softened
- 1 cup sour cream
- 1 cup granulated sugar
- 3 large eggs
- 1 tbsp vanilla extract
- ¼ cup unsweetened cocoa powder
- 1–2 tsp red gel food coloring (for deep vampire red)
Vampire “Bite” Blood Sauce:
- ½ cup raspberry jam or strawberry preserves
- 1 tbsp water
- 1 tsp cornstarch (optional, for thickening)
👩🍳 Directions
Follow these spooky steps to make your blood-red, vampire-approved dessert.
Step 1: Prepare the Crust
- Preheat oven to 325°F (160°C).
- In a bowl, mix crushed cookies, melted butter, cocoa powder, and sugar until it resembles wet sand.
- Press mixture firmly into the bottom of the springform pan.
- Bake for 10 minutes, then remove and set aside to cool.
Step 2: Make the Cheesecake Batter
- In a large bowl, beat cream cheese until smooth.
- Add sugar, sour cream, and vanilla, mixing until fully combined.
- Add eggs one at a time, mixing gently between additions.
- Add cocoa powder and red gel food coloring. Mix until fully incorporated and batter is deep red.
Step 3: Bake the Cheesecake
- Pour the batter over the cooled crust and smooth the top with a spatula.
- Place the springform pan on a baking sheet.
- Bake for 55–65 minutes, until the edges are set and the center jiggles slightly.
- Turn off the oven, crack the door open, and let the cheesecake cool inside for 1 hour.
- Remove from oven and let cool at room temperature for another hour.
- Chill in the refrigerator for at least 4 hours (preferably overnight).
Step 4: Make the Blood Sauce
- In a small saucepan, combine raspberry jam and water.
- Heat over low heat, stirring constantly.
- If a thicker consistency is desired, dissolve cornstarch in 1 tsp water and stir into the sauce. Simmer for 2 minutes.
- Remove from heat and let cool completely.
Step 5: Decorate with Vampire Bites
- Once cheesecake is fully chilled, use a toothpick or straw to poke 2 small “bite marks” into the top.
- Use a dropper or small spoon to fill each hole with blood sauce.
- Let some sauce drip down the sides for a realistic, spooky effect.
🍽️ Servings & Timing
- Yield: 12–14 slices
- Prep Time: 25 minutes
- Cook Time: 60–70 minutes
- Cooling + Chill Time: 5–6 hours total
- Total Time: ~6½ hours (most of it hands-off)
Perfect for Halloween parties, horror movie nights, or October birthdays.
🧊 Storage & Reheating
Storage:
- Refrigerator: Store in the fridge for up to 5 days, covered.
- Freezer: Freeze individual slices wrapped in plastic wrap and foil for up to 2 months. Thaw in the fridge overnight before serving.
Reheating:
- Cheesecake is best served chilled.
- No reheating necessary!
🥄 Variations
Make this dessert your own with these hauntingly good twists:
No-Bake Version:
- Use a no-bake cheesecake base (cream cheese + whipped cream) and chill instead of bake.
Crust Variations:
- Try gluten-free cookies or almond flour for a gluten-free option.
Flavor Boosts:
- Add orange zest or a few drops of almond extract for a twist on the classic.
Toppings:
- Garnish with blackberries, dark chocolate curls, or edible glitter for extra drama.
Mini Cheesecakes:
- Bake in muffin tins with liners for individual servings.
❓ 10 FAQs
1. Can I make this cheesecake ahead of time?
Yes! In fact, it’s best made 1 day ahead so it sets perfectly.
2. Do I have to use red food coloring?
For the vampire red effect, yes—but you can use natural beet powder or omit entirely for a chocolate cheesecake.
3. What can I use instead of raspberry jam?
Strawberry or cherry preserves work well. Just make sure it’s smooth and spoonable.
4. Can I make this cheesecake gluten-free?
Yes, just use gluten-free cookies for the crust.
5. Why is my cheesecake cracking?
Cheesecakes crack if overmixed or cooled too quickly. Let it cool slowly in the oven with the door cracked.
6. Can I use low-fat cream cheese?
You can, but it may affect the texture. Full-fat is best for creaminess.
7. How long does it need to chill?
At least 4 hours, but overnight is ideal for perfect slicing and setting.
8. Can I use a different pan?
Yes, but springform pans work best for easy removal. If using a regular pan, line with parchment for lifting.
9. What’s the best way to slice cheesecake cleanly?
Use a hot knife, wiping clean between slices.
10. Is this safe for kids?
Absolutely! It’s spooky, sweet, and fun for all ages—no alcohol, no artificial weirdness.
🏁 Conclusion
Halloween is about more than just costumes and candy—it’s also the perfect time to get playful in the kitchen. This Vampire Bite Red Velvet Cheesecake is the ultimate spooky showstopper that’s equal parts creamy, chocolatey, and delightfully eerie.
Whether you’re throwing a haunted party or just enjoying a scary movie night, this cheesecake adds a gory (but delicious) twist to your celebration. From the blood-red filling to the dramatic vampire “bite” marks, it’s guaranteed to impress guests of all ages.
So grab your cape, heat up your oven, and whip up a dessert that drips with drama and screams flavor. Happy haunting!
Vampire Bite Red Velvet Cheesecake – A Hauntingly Delicious Halloween Dessert
Ingredients
Equipment
Method
- Follow these spooky steps to make your blood-red, vampire-approved dessert.
- Preheat oven to 325°F (160°C).
- In a bowl, mix crushed cookies, melted butter, cocoa powder, and sugar until it resembles wet sand.
- Press mixture firmly into the bottom of the springform pan.
- Bake for 10 minutes, then remove and set aside to cool.
- In a large bowl, beat cream cheese until smooth.
- Add sugar, sour cream, and vanilla, mixing until fully combined.
- Add eggs one at a time, mixing gently between additions.
- Add cocoa powder and red gel food coloring. Mix until fully incorporated and batter is deep red.
- Pour the batter over the cooled crust and smooth the top with a spatula.
- Place the springform pan on a baking sheet.
- Bake for 55–65 minutes, until the edges are set and the center jiggles slightly.
- Turn off the oven, crack the door open, and let the cheesecake cool inside for 1 hour.
- Remove from oven and let cool at room temperature for another hour.
- Chill in the refrigerator for at least 4 hours (preferably overnight).
- In a small saucepan, combine raspberry jam and water.
- Heat over low heat, stirring constantly.
- If a thicker consistency is desired, dissolve cornstarch in 1 tsp water and stir into the sauce. Simmer for 2 minutes.
- Remove from heat and let cool completely.
- Once cheesecake is fully chilled, use a toothpick or straw to poke 2 small “bite marks” into the top.
- Use a dropper or small spoon to fill each hole with blood sauce.
- Let some sauce drip down the sides for a realistic, spooky effect.
Notes
Yes! In fact, it’s best made 1 day ahead so it sets perfectly. 2. Do I have to use red food coloring?
For the vampire red effect, yes—but you can use natural beet powder or omit entirely for a chocolate cheesecake. 3. What can I use instead of raspberry jam?
Strawberry or cherry preserves work well. Just make sure it’s smooth and spoonable. 4. Can I make this cheesecake gluten-free?
Yes, just use gluten-free cookies for the crust. 5. Why is my cheesecake cracking?
Cheesecakes crack if overmixed or cooled too quickly. Let it cool slowly in the oven with the door cracked. 6. Can I use low-fat cream cheese?
You can, but it may affect the texture. Full-fat is best for creaminess. 7. How long does it need to chill?
At least 4 hours, but overnight is ideal for perfect slicing and setting. 8. Can I use a different pan?
Yes, but springform pans work best for easy removal. If using a regular pan, line with parchment for lifting. 9. What’s the best way to slice cheesecake cleanly?
Use a hot knife, wiping clean between slices. 10. Is this safe for kids?
Absolutely! It’s spooky, sweet, and fun for all ages—no alcohol, no artificial weirdness. 🏁 Conclusion Halloween is about more than just costumes and candy—it’s also the perfect time to get playful in the kitchen. This Vampire Bite Red Velvet Cheesecake is the ultimate spooky showstopper that’s equal parts creamy, chocolatey, and delightfully eerie. Whether you’re throwing a haunted party or just enjoying a scary movie night, this cheesecake adds a gory (but delicious) twist to your celebration. From the blood-red filling to the dramatic vampire “bite” marks, it’s guaranteed to impress guests of all ages. So grab your cape, heat up your oven, and whip up a dessert that drips with drama and screams flavor. Happy haunting!