🎉 Introduction
When autumn rolls in, it’s time for cozy sweaters, pumpkin spice, and all things sweet and festive. And what better way to celebrate than with adorable, bite-sized treats that look like pumpkins and taste like Oreo cheesecake heaven?
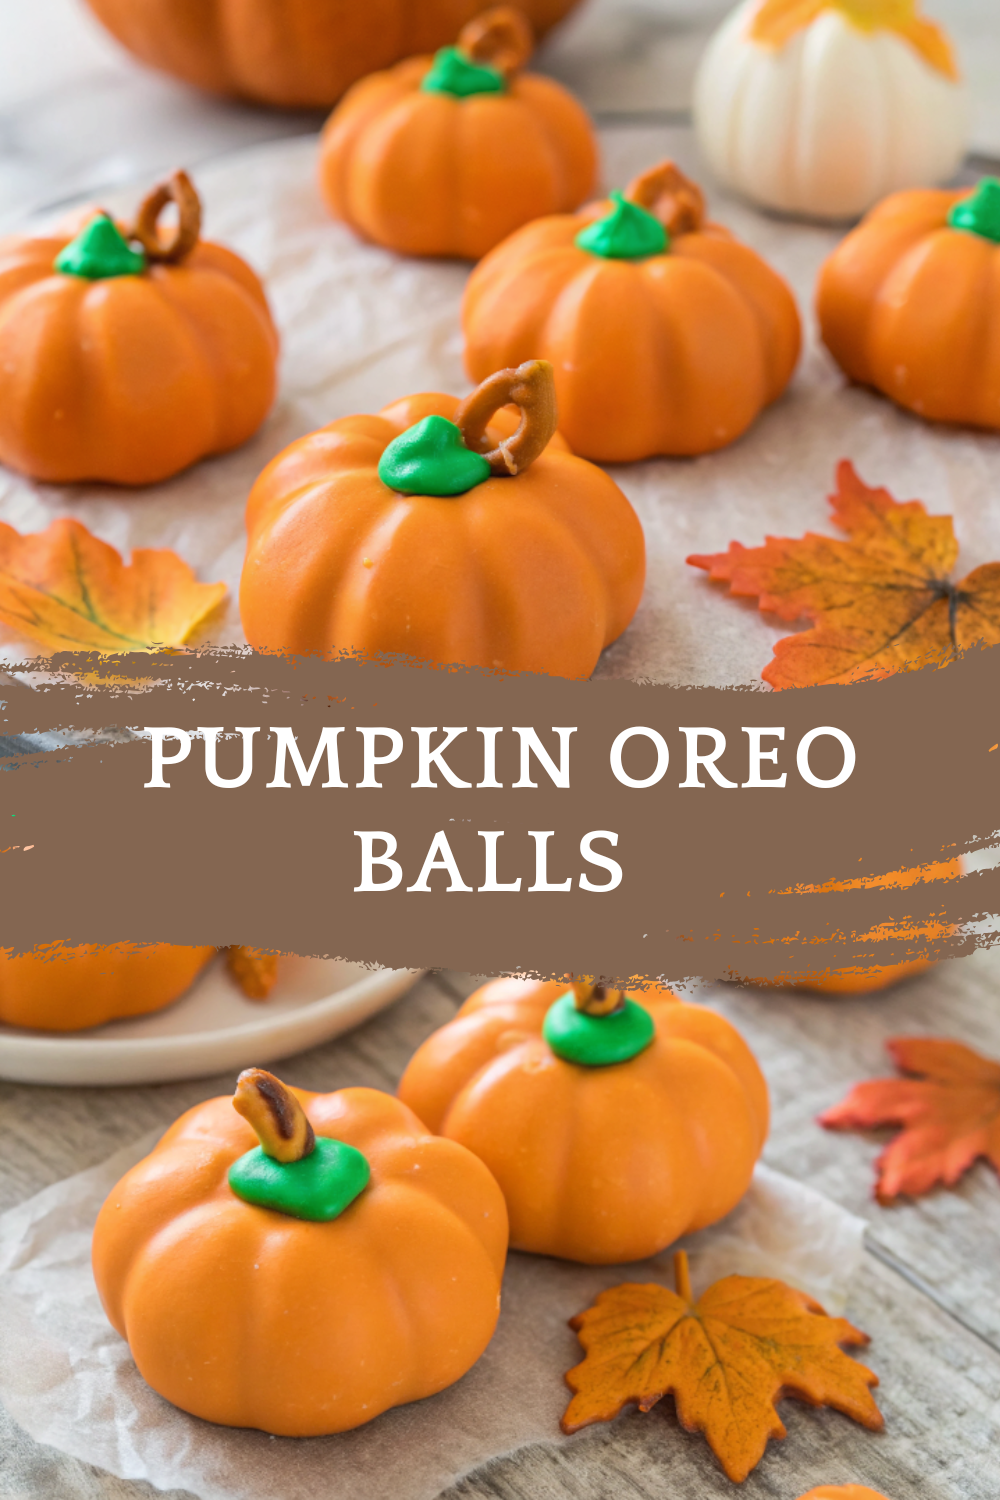
These Pumpkin Oreo Balls are a fun, easy, and crowd-pleasing dessert perfect for Halloween parties, Thanksgiving gatherings, or even fall movie nights. They’re made with just three simple ingredients — Oreo cookies, cream cheese, and orange candy melts — yet they taste like you spent all day in the kitchen.
Imagine the soft, chocolatey center of crushed Oreos mixed with creamy cheese, dipped in orange candy coating, and finished with a festive pumpkin shape. The result is sweet, rich, slightly tangy, and melt-in-your-mouth delicious.
These little truffles are not only irresistible but also beautifully festive — the perfect edible centerpiece for your dessert table. And the best part? They’re completely no-bake, so you can whip up a batch in no time.
🧰 Equipment Needed
Before you start rolling your pumpkin magic, gather these simple tools:
- Food processor (or blender)
- Mixing bowl
- Spatula or wooden spoon
- Baking sheet
- Parchment paper or wax paper
- Microwave-safe bowl (for melting candy)
- Fork or dipping tool
- Toothpick or skewer (for shaping the pumpkin ridges)
- Refrigerator or freezer space
🛒 Ingredients
Cookies & Cream Base
- 36 Oreo cookies, whole (cream included)
Dairy
- 8 oz cream cheese, softened
Candy Coating
- 12 oz orange candy melts (or orange-colored white chocolate)
👩🍳 Directions
Step 1: Prepare the Oreo Mixture
- Place the Oreo cookies in a food processor.
- Pulse until they turn into fine crumbs. (You can also crush them in a zip-top bag with a rolling pin.)
- Add the softened cream cheese to the crumbs and pulse again until fully combined.
- The mixture should look dark, thick, and slightly sticky — like a rich dough.
🍫 This creamy Oreo base is what gives these truffles their signature cookies-and-cream flavor!
Step 2: Chill the Mixture
- Transfer the mixture to a bowl, cover with plastic wrap, and chill for 20–30 minutes in the refrigerator.
- This makes it easier to roll into smooth, firm balls later.
Step 3: Form the Balls
- Once chilled, scoop out tablespoon-sized portions of the mixture.
- Roll each portion between your palms to form a smooth ball.
- Place the rolled balls on a parchment-lined baking sheet.
🎃 Each ball will become a mini pumpkin soon — soft inside, candy-coated outside.
Step 4: Chill Again Before Dipping
- Place the tray in the freezer for 15–20 minutes to firm up the balls before dipping.
❄️ Cold truffles make dipping easier and help the candy coating set quickly.
Step 5: Melt the Candy Coating
- In a microwave-safe bowl, melt the orange candy melts in 30-second intervals, stirring between each, until smooth.
- Let the melted candy sit for a minute or two so it’s warm but not scorching.
🍊 If you don’t have orange melts, use white chocolate and stir in orange food coloring.
Step 6: Dip and Coat the Oreo Balls
- Using a fork or dipping tool, lower each chilled Oreo ball into the melted candy coating.
- Gently tap off any excess coating, then place the coated truffle back on the parchment-lined tray.
🧡 Work quickly — the candy coating hardens fast as it cools.
Step 7: Shape Like Pumpkins
- While the coating is still slightly soft, use a toothpick or skewer to draw vertical lines down the sides to create pumpkin ridges.
- Optional: Press a small piece of pretzel stick, green candy, or chocolate chip on top as a pumpkin “stem.”
🎃 This step turns simple truffles into adorable edible pumpkins!
Step 8: Set and Serve
- Place the finished truffles in the refrigerator for 30 minutes to set completely.
- Once hardened, arrange them on a serving platter or package them in treat boxes for gifting.
🍬 They’re creamy inside, crisp on the outside, and perfectly festive from top to bottom.
🍽️ Servings & Timing
- Servings: About 24–30 truffles
- Prep Time: 20 minutes
- Chill Time: 1 hour total
- Total Time: 1 hour 20 minutes
Perfect for Halloween parties, Thanksgiving desserts, or fall snacking.
🧊 Storage & Reheating
Refrigeration:
- Store in an airtight container in the refrigerator for up to 1 week.
Freezing:
- Freeze for up to 2 months in a sealed container.
- Thaw overnight in the refrigerator before serving.
Reheating:
- None needed! Serve chilled or at room temperature for the best texture.
💡 Tip: If making ahead for parties, keep them refrigerated until ready to serve so the coating stays firm.
🥄 Variations
1. Pumpkin Spice Oreo Balls
Add 1 tsp pumpkin pie spice or cinnamon to the mixture for an autumn twist.
2. White Chocolate Drizzle
Drizzle melted white chocolate over the orange coating for a stunning contrast.
3. Dark Chocolate Pumpkins
Use dark chocolate or semi-sweet candy melts for a dramatic Halloween look.
4. Crushed Cookie Coating
Before the candy sets, roll the truffles in crushed Oreos for texture.
5. Pumpkin Patch Display
Arrange the truffles on crushed graham crackers or cookie crumbs to mimic a “pumpkin patch” centerpiece.
6. Mint Oreo Balls
Use mint Oreos for a chocolate-mint variation with the same fun pumpkin look.
❓ 10 FAQs
1. Can I use flavored Oreos?
Yes! Pumpkin spice, golden, or chocolate Oreos all work beautifully.
2. Can I make them dairy-free?
Use dairy-free cream cheese and vegan candy melts to keep it dairy-free.
3. What can I use instead of candy melts?
Melted white chocolate chips with a few drops of oil for smoothness works great.
4. How do I prevent the coating from cracking?
Ensure the balls aren’t too cold before dipping; slightly chilled is perfect.
5. Can I make them without a food processor?
Yes! Crush Oreos in a zip-top bag with a rolling pin, then mix with cream cheese by hand.
6. Can I freeze the dough before coating?
Absolutely — just thaw slightly before dipping so the coating adheres.
7. Can I color the coating differently?
Yes, you can make them white, dark brown, or yellow for a fall color mix.
8. Can I use a different shape?
Roll into balls, squares, or even shape them into mini ghosts or turkeys for themed desserts!
9. What do they taste like?
Like creamy Oreo cheesecake bites — sweet, chocolatey, and slightly tangy.
10. Can I double the recipe?
Definitely — this recipe doubles easily for parties or gifting.
🏁 Conclusion
These Pumpkin Oreo Balls are more than just a dessert — they’re tiny bites of fall joy. With their smooth Oreo-cream cheese filling and festive orange coating, they’re as beautiful as they are delicious.
Each bite bursts with rich cookies-and-cream flavor, balanced by the creamy tang of cheesecake and the sweet snap of candy coating. They’re perfect for any fall occasion — whether you’re hosting a Halloween bash, baking for Thanksgiving, or simply satisfying your pumpkin-season cravings.
Best of all, they’re no-bake, make-ahead friendly, and so fun to decorate. Once you see how easy (and tasty!) they are, these truffles will become your go-to fall treat every year. 🎃✨
So grab your Oreos, melt some candy, and roll up your sleeves — because these Pumpkin Oreo Balls are ready to make your season deliciously sweet!
Pumpkin Oreo Balls | No-Bake Fall Dessert Bites for Halloween & Thanksgiving
Ingredients
Equipment
Method
- Place the Oreo cookies in a food processor.
- Pulse until they turn into fine crumbs. (You can also crush them in a zip-top bag with a rolling pin.)
- Add the softened cream cheese to the crumbs and pulse again until fully combined.
- The mixture should look dark, thick, and slightly sticky — like a rich dough.
- Transfer the mixture to a bowl, cover with plastic wrap, and chill for 20–30 minutes in the refrigerator.
- This makes it easier to roll into smooth, firm balls later.
- Once chilled, scoop out tablespoon-sized portions of the mixture.
- Roll each portion between your palms to form a smooth ball.
- Place the rolled balls on a parchment-lined baking sheet.
- Place the tray in the freezer for 15–20 minutes to firm up the balls before dipping.
- In a microwave-safe bowl, melt the orange candy melts in 30-second intervals, stirring between each, until smooth.
- Let the melted candy sit for a minute or two so it’s warm but not scorching.
- Step 6: Dip and Coat the Oreo Balls
- Using a fork or dipping tool, lower each chilled Oreo ball into the melted candy coating.
- Gently tap off any excess coating, then place the coated truffle back on the parchment-lined tray.
- While the coating is still slightly soft, use a toothpick or skewer to draw vertical lines down the sides to create pumpkin ridges.
- Optional: Press a small piece of pretzel stick, green candy, or chocolate chip on top as a pumpkin “stem.”
- Place the finished truffles in the refrigerator for 30 minutes to set completely.
- Once hardened, arrange them on a serving platter or package them in treat boxes for gifting.
Notes
Refrigeration: Store in an airtight container in the refrigerator for up to 1 week. Freezing: Freeze for up to 2 months in a sealed container. Thaw overnight in the refrigerator before serving. Reheating: None needed! Serve chilled or at room temperature for the best texture. 💡 Tip: If making ahead for parties, keep them refrigerated until ready to serve so the coating stays firm. 🥄 Variations
1. Pumpkin Spice Oreo Balls Add 1 tsp pumpkin pie spice or cinnamon to the mixture for an autumn twist. 2. White Chocolate Drizzle Drizzle melted white chocolate over the orange coating for a stunning contrast. 3. Dark Chocolate Pumpkins Use dark chocolate or semi-sweet candy melts for a dramatic Halloween look. 4. Crushed Cookie Coating Before the candy sets, roll the truffles in crushed Oreos for texture. 5. Pumpkin Patch Display Arrange the truffles on crushed graham crackers or cookie crumbs to mimic a “pumpkin patch” centerpiece. 6. Mint Oreo Balls Use mint Oreos for a chocolate-mint variation with the same fun pumpkin look. ❓ 10 FAQs 1. Can I use flavored Oreos?
Yes! Pumpkin spice, golden, or chocolate Oreos all work beautifully. 2. Can I make them dairy-free?
Use dairy-free cream cheese and vegan candy melts to keep it dairy-free. 3. What can I use instead of candy melts?
Melted white chocolate chips with a few drops of oil for smoothness works great. 4. How do I prevent the coating from cracking?
Ensure the balls aren’t too cold before dipping; slightly chilled is perfect. 5. Can I make them without a food processor?
Yes! Crush Oreos in a zip-top bag with a rolling pin, then mix with cream cheese by hand. 6. Can I freeze the dough before coating?
Absolutely — just thaw slightly before dipping so the coating adheres. 7. Can I color the coating differently?
Yes, you can make them white, dark brown, or yellow for a fall color mix. 8. Can I use a different shape?
Roll into balls, squares, or even shape them into mini ghosts or turkeys for themed desserts! 9. What do they taste like?
Like creamy Oreo cheesecake bites — sweet, chocolatey, and slightly tangy. 10. Can I double the recipe?
Definitely — this recipe doubles easily for parties or gifting. 🏁 Conclusion These Pumpkin Oreo Balls are more than just a dessert — they’re tiny bites of fall joy. With their smooth Oreo-cream cheese filling and festive orange coating, they’re as beautiful as they are delicious. Each bite bursts with rich cookies-and-cream flavor, balanced by the creamy tang of cheesecake and the sweet snap of candy coating. They’re perfect for any fall occasion — whether you’re hosting a Halloween bash, baking for Thanksgiving, or simply satisfying your pumpkin-season cravings. Best of all, they’re no-bake, make-ahead friendly, and so fun to decorate. Once you see how easy (and tasty!) they are, these truffles will become your go-to fall treat every year. 🎃✨ So grab your Oreos, melt some candy, and roll up your sleeves — because these Pumpkin Oreo Balls are ready to make your season deliciously sweet!


