❤️ Introduction
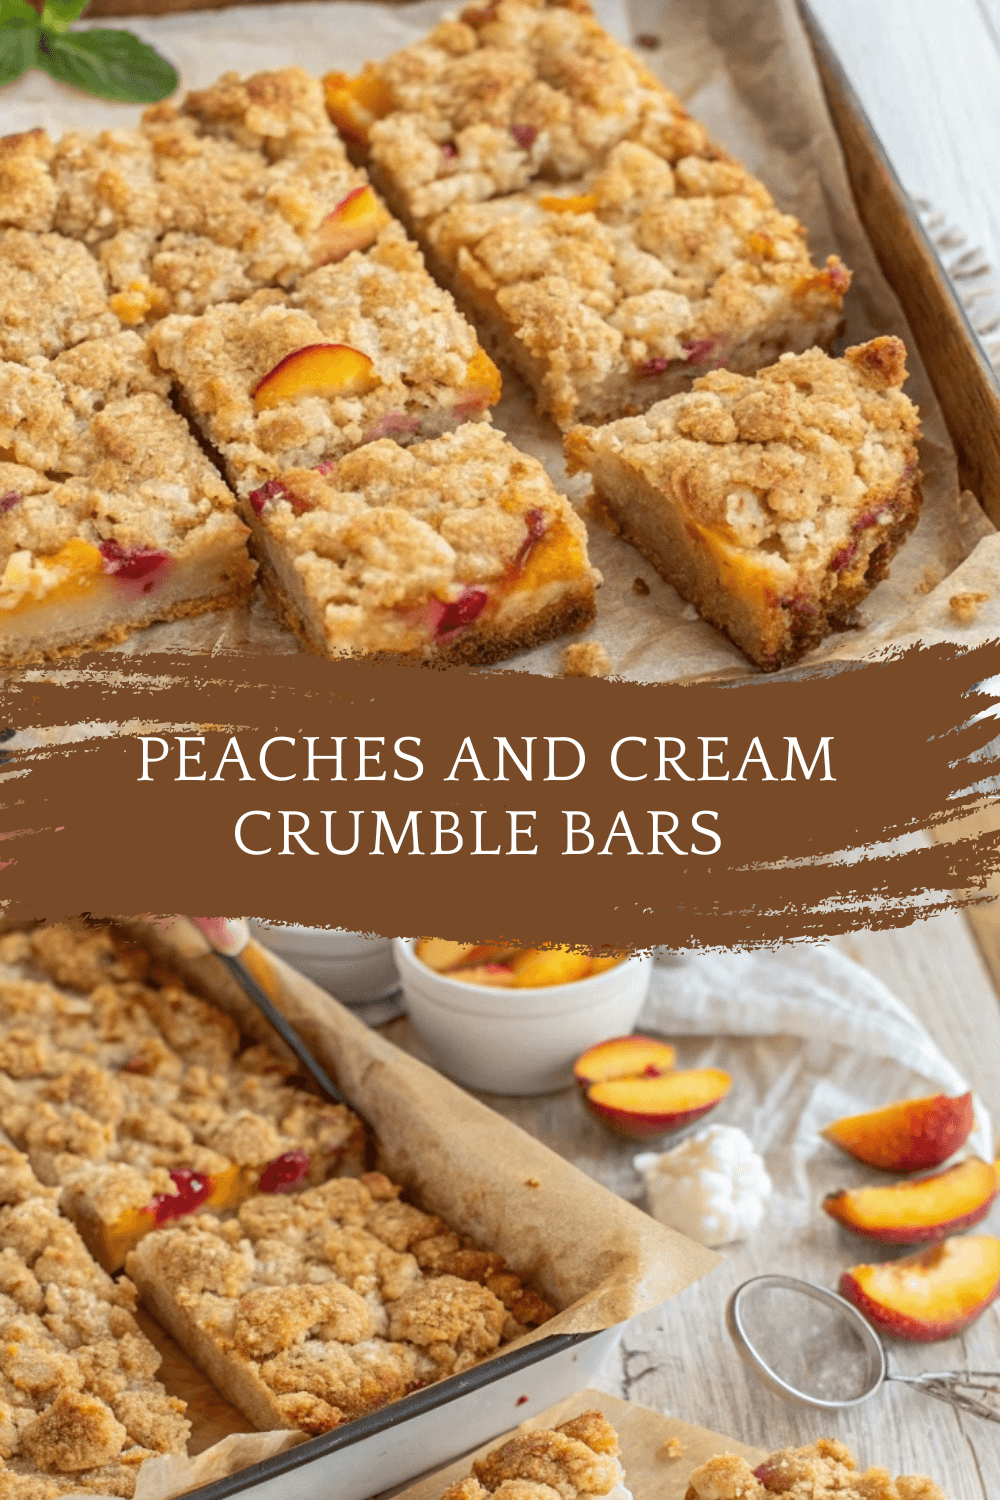
There’s something about the combination of sweet peaches and rich cream tucked between buttery crumble layers that makes every bite feel like a celebration. Enter: Peaches and Cream Crumble Bars. These heavenly squares are the perfect balance of tender peach filling, creamy richness, and crumbly golden topping. Whether served as a casual treat or a show-stopping picnic dessert, they’re bound to impress.
Made with fresh, juicy peaches, a hint of cinnamon, and a luscious cream filling, these bars deliver summer flavors in every square. The base doubles as the topping, meaning fewer steps and dishes. Plus, they slice beautifully and pack up easily — ideal for lunchboxes, potlucks, or just enjoying with coffee on a warm afternoon.

🛒 Ingredients
🍑 Peach Filling:
- 5 cups peaches, peeled and pitted (sliced or diced)
- ¼ cup brown sugar
- ½ tsp ground cinnamon
🧁 Crumble Base & Topping:
- 2¾ cups all-purpose flour
- 1⅔ cups granulated sugar
- ¾ tsp salt
- 1¼ cups unsalted butter, cold and cubed
🥛 Cream Layer:
- 6 tbsp heavy cream
- ½ tsp vanilla extract
👨🍳 Directions
Step 1: Preheat Oven & Prep Pan
- Preheat oven to 350°F (175°C).
- Line a 9×13-inch baking dish with parchment paper, leaving overhang on two sides for easy removal.
Step 2: Prepare the Crumble Mixture
- In a large bowl, whisk together flour, granulated sugar, and salt.
- Add cubed butter and use a pastry cutter or fingers to cut it in until the mixture resembles coarse crumbs.
- Reserve 1½ cups of the crumble for topping.
- Press the remaining crumble firmly into the bottom of the prepared baking dish to form the crust.
Step 3: Make the Peach Filling
- In another bowl, mix sliced peaches with brown sugar and cinnamon.
- Let it sit for 5–10 minutes to draw out juices.
Step 4: Mix the Cream Layer
- Whisk together heavy cream and vanilla extract in a small bowl.
Step 5: Assemble
- Spread the cream mixture evenly over the crust.
- Distribute the peach mixture over the cream.
- Sprinkle the reserved crumble topping evenly over the peaches.
Step 6: Bake
- Bake for 45–50 minutes or until the top is golden and the filling is bubbling around the edges.
Step 7: Cool & Slice
- Cool completely in the pan.
- Chill in the fridge for at least 1 hour before slicing for cleaner bars.
⏱️ Servings & Time
- Servings: 12–16 bars
- Prep Time: 25 minutes
- Bake Time: 45–50 minutes
- Cooling Time: 60 minutes
- Total Time: ~2 hours
🍽️ Serving Suggestions
- Serve chilled or at room temperature.
- Top with whipped cream or vanilla ice cream for dessert.
- Pair with iced tea, peach lemonade, or a hot coffee.
- Garnish with fresh mint or a light dusting of powdered sugar.
🔄 Variations
- Berry & Peach: Mix in raspberries or blueberries with the peaches.
- Almond Crumble: Add ¼ cup ground almonds to the crumble for a nutty kick.
- Gluten-Free: Use a 1:1 gluten-free flour blend.
- Brown Butter Base: Swap plain butter for browned butter to deepen the flavor.
🧊 Storage & Reheating
Storage:
- Store in an airtight container in the fridge for up to 5 days.
- Can be frozen for up to 2 months. Thaw overnight in the fridge.
Reheating:
- Enjoy cold or at room temperature.
- For a warm serving, microwave each bar for 15–20 seconds or heat in a 300°F oven for 5–8 minutes.
❓ 10 Frequently Asked Questions
1. Can I use canned or frozen peaches?
Yes. If using canned, drain well. If using frozen, thaw and drain excess moisture.
2. Can I use other fruits?
Absolutely! Try nectarines, plums, or mixed berries.
3. Can I skip the cream layer?
Yes, but it adds a rich contrast to the fruit and crumb.
4. How do I get clean slices?
Chill the bars before slicing and use a sharp knife wiped clean between cuts.
5. What if I don’t have heavy cream?
Use half-and-half or full-fat Greek yogurt as alternatives.
6. Can I reduce the sugar?
Yes. Cut the granulated sugar to 1¼ cups and brown sugar to 2 tbsp for a lighter taste.
7. Do I have to peel the peaches?
It’s optional. Peels soften during baking, but peeling gives a smoother texture.
8. Can I make this ahead of time?
Yes! Bake a day in advance and store covered in the fridge.
9. Should I cook the peaches first?
No, fresh peaches soften during baking. Pre-cooking is unnecessary.
10. Can I make this in a smaller pan?
Use an 8×8 or 9×9 pan and halve the ingredients for fewer servings.

💡 Expert Tips
- Use ripe but firm peaches to avoid excess liquid.
- Chill the butter for the crumble — cold butter = crisp topping.
- Let bars cool before cutting for the best texture.
- Taste your peaches first — adjust sugar in filling if needed.
- For a caramel twist, drizzle with a bit of salted caramel after baking.
🏁 Conclusion
These Peaches and Cream Crumble Bars are a summertime dream in dessert form. 🍑💫 The layers — buttery crust, silky cream, and juicy fruit — come together effortlessly for a dessert that’s simple enough for weekday baking but delicious enough for celebrations. Whether you serve them chilled at a backyard BBQ or wrap them up for a picnic, they’re guaranteed to bring smiles.
Once you make them, you’ll wonder how you ever lived without this golden, peachy perfection. One bite, and you’ll be hooked.
Peaches and Cream Crumble Bars – Buttery Bliss with a Fruity Twist
Ingredients
Method
- Preheat oven to 350°F (175°C).
- Line a 9×13-inch baking dish with parchment paper, leaving overhang on two sides for easy removal.
- In a large bowl, whisk together flour, granulated sugar, and salt.
- Add cubed butter and use a pastry cutter or fingers to cut it in until the mixture resembles coarse crumbs.
- Reserve 1½ cups of the crumble for topping.
- Press the remaining crumble firmly into the bottom of the prepared baking dish to form the crust.
- In another bowl, mix sliced peaches with brown sugar and cinnamon.
- Let it sit for 5–10 minutes to draw out juices.
- Whisk together heavy cream and vanilla extract in a small bowl.
- Spread the cream mixture evenly over the crust.
- Distribute the peach mixture over the cream.
- Sprinkle the reserved crumble topping evenly over the peaches.
- Bake for 45–50 minutes or until the top is golden and the filling is bubbling around the edges.
- Cool completely in the pan.
- Chill in the fridge for at least 1 hour before slicing for cleaner bars.
Notes
Serve chilled or at room temperature. Top with whipped cream or vanilla ice cream for dessert. Pair with iced tea, peach lemonade, or a hot coffee. Garnish with fresh mint or a light dusting of powdered sugar. 🔄 Variations
Berry & Peach: Mix in raspberries or blueberries with the peaches. Almond Crumble: Add ¼ cup ground almonds to the crumble for a nutty kick. Gluten-Free: Use a 1:1 gluten-free flour blend. Brown Butter Base: Swap plain butter for browned butter to deepen the flavor. 🧊 Storage & Reheating
Storage:
Store in an airtight container in the fridge for up to 5 days. Can be frozen for up to 2 months. Thaw overnight in the fridge. Reheating:
Enjoy cold or at room temperature. For a warm serving, microwave each bar for 15–20 seconds or heat in a 300°F oven for 5–8 minutes. ❓ 10 Frequently Asked Questions
1. Can I use canned or frozen peaches?
Yes. If using canned, drain well. If using frozen, thaw and drain excess moisture. 2. Can I use other fruits?
Absolutely! Try nectarines, plums, or mixed berries. 3. Can I skip the cream layer?
Yes, but it adds a rich contrast to the fruit and crumb. 4. How do I get clean slices?
Chill the bars before slicing and use a sharp knife wiped clean between cuts. 5. What if I don’t have heavy cream?
Use half-and-half or full-fat Greek yogurt as alternatives. 6. Can I reduce the sugar?
Yes. Cut the granulated sugar to 1¼ cups and brown sugar to 2 tbsp for a lighter taste. 7. Do I have to peel the peaches?
It’s optional. Peels soften during baking, but peeling gives a smoother texture. 8. Can I make this ahead of time?
Yes! Bake a day in advance and store covered in the fridge. 9. Should I cook the peaches first?
No, fresh peaches soften during baking. Pre-cooking is unnecessary. 10. Can I make this in a smaller pan?
Use an 8×8 or 9×9 pan and halve the ingredients for fewer servings. 💡 Expert Tips
Use ripe but firm peaches to avoid excess liquid. Chill the butter for the crumble — cold butter = crisp topping. Let bars cool before cutting for the best texture. Taste your peaches first — adjust sugar in filling if needed. For a caramel twist, drizzle with a bit of salted caramel after baking. 🏁 Conclusion
These Peaches and Cream Crumble Bars are a summertime dream in dessert form. 🍑💫 The layers — buttery crust, silky cream, and juicy fruit — come together effortlessly for a dessert that’s simple enough for weekday baking but delicious enough for celebrations. Whether you serve them chilled at a backyard BBQ or wrap them up for a picnic, they’re guaranteed to bring smiles. Once you make them, you’ll wonder how you ever lived without this golden, peachy perfection. One bite, and you’ll be hooked.


