🎉 Introduction
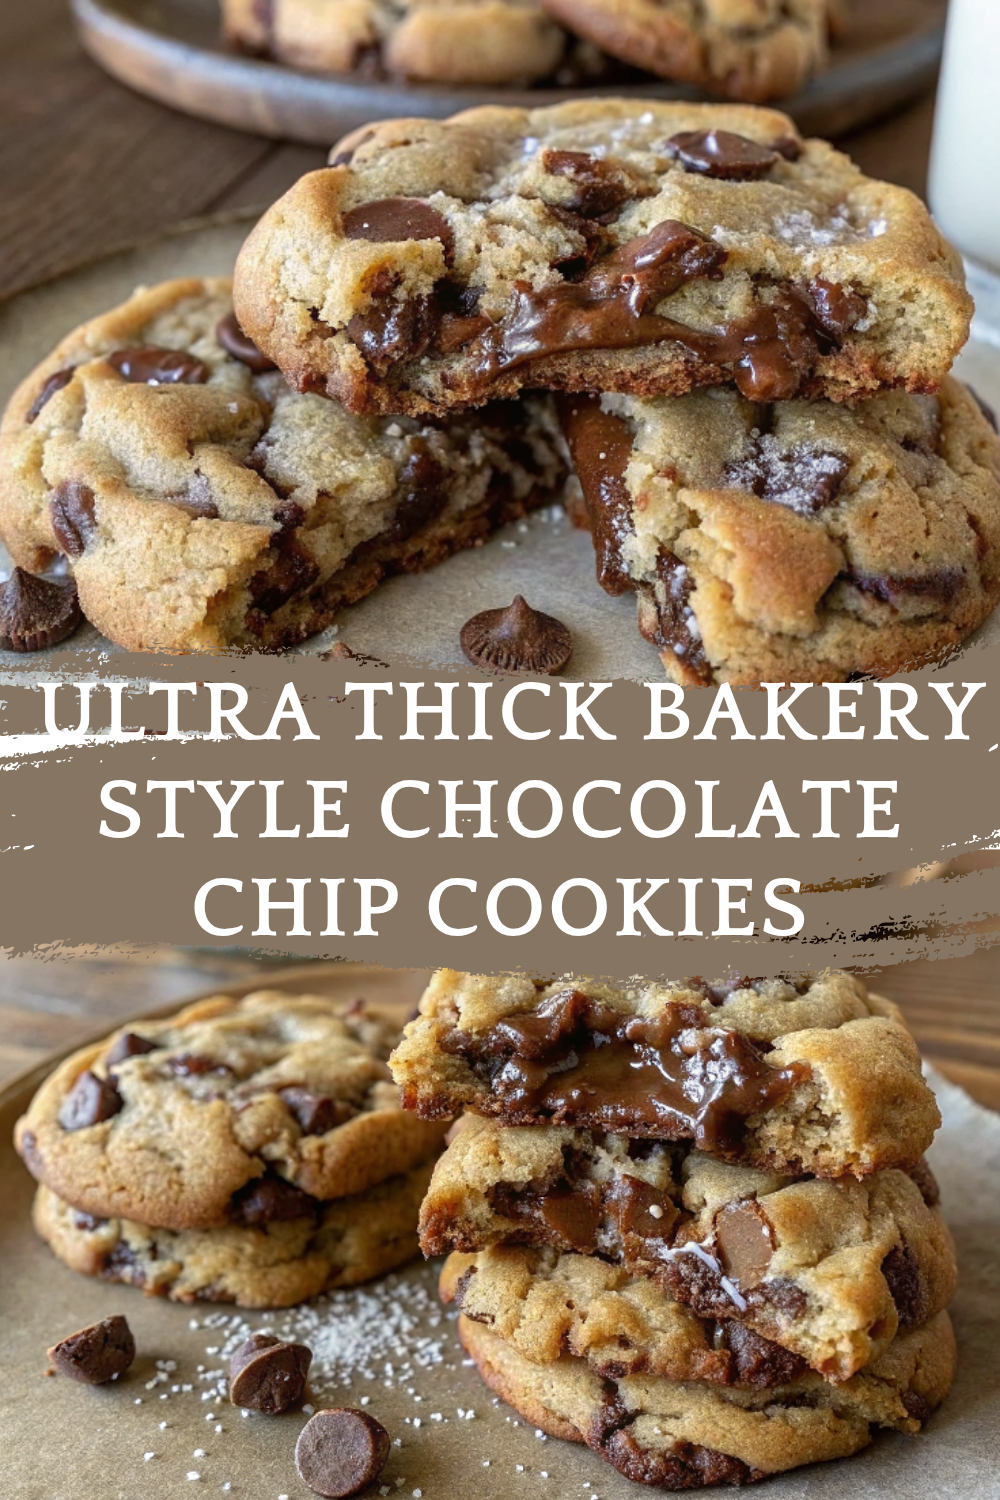
If you’re looking for the ultimate chocolate chip cookie experience, it’s time to skip the flat, basic kind and dive straight into a batch of Ultra Thick Bakery Style Chocolate Chip Cookies. These are the cookies of your dreams: thick, chewy, golden brown, and stuffed with pools of melty chocolate chips.
Inspired by those big, chunky cookies you find behind the glass at high-end bakeries, this recipe brings the chewy center, crisp edges, and extra height that makes every bite feel indulgent. And the best part? You can make them right at home with a handful of pantry staples and a little chilling magic.
Whether you’re baking for a celebration or just because you deserve a treat (spoiler: you do), these cookies are bold, beautiful, and 100% bakery-worthy.
🧰 Equipment Needed
You’ll only need basic tools to whip up this thick, chewy perfection:
- Large mixing bowl
- Medium bowl
- Hand or stand mixer (optional but helpful)
- Baking sheets
- Parchment paper or silicone baking mats
- Cookie scoop or ice cream scoop
- Spatula
- Measuring cups and spoons
- Cooling rack
🛒 Ingredients
🥚 Fresh Products:
- 2 large eggs
🧂 Pantry Items and Spices:
- 2½ cups all-purpose flour
- 1 teaspoon baking soda
- ½ teaspoon salt (or sea salt)
- 1 cup granulated sugar
- ½ cup packed light brown sugar
- 1 teaspoon vanilla extract
🍫 Mix-ins:
- 3 cups chocolate chips (use a mix of semisweet and dark for a bakery effect)
🧈 Dairy:
- 14 tablespoons unsalted butter, melted and slightly cooled
Optional for topping: Extra chocolate chips and flaky sea salt for that bakery-style finish.
👩🍳 Directions
Step 1: Mix the Dry Ingredients
In a medium bowl, whisk together flour, baking soda, and salt. Set aside.
Step 2: Prepare the Wet Ingredients
In a large bowl, beat together melted butter, granulated sugar, and brown sugar until smooth and creamy. Add in eggs, one at a time, mixing well after each. Stir in vanilla extract.
Step 3: Combine and Fold
Slowly add the dry ingredients into the wet mixture. Mix until a thick dough forms — don’t overmix.
Gently fold in chocolate chips, saving a few to press on top of the dough balls later.
Step 4: Chill the Dough
Cover the bowl and refrigerate for at least 1 hour, or preferably overnight. This helps intensify the flavor and prevent spreading.
Chilling = thicker cookies with rich, caramelized flavor. Don’t skip it!
Step 5: Preheat and Prep
Preheat the oven to 375°F (190°C). Line baking sheets with parchment paper or silicone baking mats.
Step 6: Scoop and Shape
Use a large cookie scoop (about 3 tablespoons) to form dough balls. Stack them slightly taller than wide — this helps achieve that thick bakery look.
Place them a few inches apart on the baking sheet. Press a few extra chocolate chips into the tops of each dough ball.
Step 7: Bake
Bake for 10–13 minutes, or until the edges are golden brown and the centers are still slightly soft.
The key is to underbake just a little — they’ll finish setting on the tray!
Step 8: Cool and Set
Let cookies cool on the baking sheet for 5–10 minutes, then transfer to a wire rack to cool fully.
Sprinkle with flaky sea salt while warm for that final bakery-style touch.
🍽️ Servings & Timing
- Servings: 12–14 large cookies
- Prep Time: 15 minutes
- Chill Time: 1 hour minimum
- Bake Time: 10–13 minutes
- Total Time: ~1 hour 30 minutes
Totally worth every second for these bakery beauties!
🧊 Storage & Reheating
Storage:
- Keep cooled cookies in an airtight container at room temperature for 4–5 days.
- For maximum freshness, store with a slice of bread to maintain softness.
Freezing:
- Freeze baked cookies for up to 2 months. Thaw at room temperature.
- Freeze unbaked dough balls for future baking — no need to thaw; just add 1–2 minutes to bake time.
Reheating:
- Microwave for 10–15 seconds for gooey centers.
- Warm in the oven at 300°F for 5–7 minutes to refresh.
🥄 Variations
Want to customize your thick cookies? Try these ideas:
- Double Chocolate: Add ¼ cup cocoa powder to the dry mix for rich chocolate dough.
- Nutty Chocolate Chip: Fold in ½ cup chopped pecans, walnuts, or hazelnuts.
- Stuffed Cookies: Press a square of chocolate or a spoonful of Nutella into the center of each dough ball before baking.
- Salted Caramel: Add caramel chunks and top with sea salt.
- Espresso Boost: Add 1 teaspoon espresso powder to enhance the chocolate flavor.
- White Chocolate Macadamia: Swap semisweet chips for white chocolate and add macadamia nuts.
❓ 10 FAQs
1. Why are my cookies spreading too much?
Likely due to warm dough. Always chill the dough to keep cookies thick and tall.
2. Can I use browned butter?
Absolutely! Browned butter adds a deeper, nutty flavor — just be sure to let it cool before using.
3. What’s the best chocolate for bakery-style cookies?
Use a mix of chocolate chips and chopped chocolate bars. This gives a gooey, varied melt.
4. Why are my cookies dry?
Overbaking or too much flour. Spoon and level your flour, and pull cookies when the centers still look slightly underdone.
5. Do I need to use both types of sugar?
Yes — brown sugar adds moisture and chewiness, while white sugar helps crisp the edges.
6. Can I skip the sea salt on top?
Sure, but it elevates the flavor and gives that gourmet finish. Highly recommended!
7. How big should I make the cookies?
About 3 tablespoons of dough per cookie. Bakery-style cookies are generously sized!
8. What if I don’t have parchment paper?
You can use a silicone baking mat. Avoid greasing the pan — it can cause excess spreading.
9. Can I refrigerate dough longer than one night?
Yes, up to 3 days is fine! The flavor gets even better with time.
10. How do I make these gluten-free?
Use a 1:1 gluten-free flour blend and check your other ingredients for gluten content.
🏁 Conclusion
These Ultra Thick Bakery Style Chocolate Chip Cookies are the real deal — massive, gooey, golden, and outrageously delicious. With a perfect blend of crisp edges and soft centers, they deliver all the magic of a bakery cookie with none of the wait in line.
Whether you’re gifting them, sharing with friends, or stashing them all for yourself (no judgment), one thing is guaranteed: they won’t last long.
So preheat your oven, grab that butter and chocolate, and bake your way to cookie heaven.
Ultra Thick Bakery Style Chocolate Chip Cookies – Crispy Edges, Gooey Centers, and Loaded with Chocolate!
Ingredients
Equipment
Method
- In a medium bowl, whisk together flour, baking soda, and salt. Set aside.
- In a large bowl, beat together melted butter, granulated sugar, and brown sugar until smooth and creamy. Add in eggs, one at a time, mixing well after each. Stir in vanilla extract.
- Slowly add the dry ingredients into the wet mixture. Mix until a thick dough forms — don’t overmix.
- Gently fold in chocolate chips, saving a few to press on top of the dough balls later.
- Cover the bowl and refrigerate for at least 1 hour, or preferably overnight. This helps intensify the flavor and prevent spreading.
- Chilling = thicker cookies with rich, caramelized flavor. Don’t skip it!
- Preheat the oven to 375°F (190°C). Line baking sheets with parchment paper or silicone baking mats.
- Use a large cookie scoop (about 3 tablespoons) to form dough balls. Stack them slightly taller than wide — this helps achieve that thick bakery look.
- Place them a few inches apart on the baking sheet. Press a few extra chocolate chips into the tops of each dough ball.
- Bake for 10–13 minutes, or until the edges are golden brown and the centers are still slightly soft.
- The key is to underbake just a little — they’ll finish setting on the tray!
- Let cookies cool on the baking sheet for 5–10 minutes, then transfer to a wire rack to cool fully.
- Sprinkle with flaky sea salt while warm for that final bakery-style touch.
Notes
Storage:
Keep cooled cookies in an airtight container at room temperature for 4–5 days. For maximum freshness, store with a slice of bread to maintain softness. Freezing:
Freeze baked cookies for up to 2 months. Thaw at room temperature. Freeze unbaked dough balls for future baking — no need to thaw; just add 1–2 minutes to bake time. Reheating:
Microwave for 10–15 seconds for gooey centers. Warm in the oven at 300°F for 5–7 minutes to refresh. 🥄 Variations
Want to customize your thick cookies? Try these ideas: Double Chocolate: Add ¼ cup cocoa powder to the dry mix for rich chocolate dough. Nutty Chocolate Chip: Fold in ½ cup chopped pecans, walnuts, or hazelnuts. Stuffed Cookies: Press a square of chocolate or a spoonful of Nutella into the center of each dough ball before baking. Salted Caramel: Add caramel chunks and top with sea salt. Espresso Boost: Add 1 teaspoon espresso powder to enhance the chocolate flavor. White Chocolate Macadamia: Swap semisweet chips for white chocolate and add macadamia nuts. ❓ 10 FAQs
1. Why are my cookies spreading too much?
Likely due to warm dough. Always chill the dough to keep cookies thick and tall. 2. Can I use browned butter?
Absolutely! Browned butter adds a deeper, nutty flavor — just be sure to let it cool before using. 3. What’s the best chocolate for bakery-style cookies?
Use a mix of chocolate chips and chopped chocolate bars. This gives a gooey, varied melt. 4. Why are my cookies dry?
Overbaking or too much flour. Spoon and level your flour, and pull cookies when the centers still look slightly underdone. 5. Do I need to use both types of sugar?
Yes — brown sugar adds moisture and chewiness, while white sugar helps crisp the edges. 6. Can I skip the sea salt on top?
Sure, but it elevates the flavor and gives that gourmet finish. Highly recommended! 7. How big should I make the cookies?
About 3 tablespoons of dough per cookie. Bakery-style cookies are generously sized! 8. What if I don’t have parchment paper?
You can use a silicone baking mat. Avoid greasing the pan — it can cause excess spreading. 9. Can I refrigerate dough longer than one night?
Yes, up to 3 days is fine! The flavor gets even better with time. 10. How do I make these gluten-free?
Use a 1:1 gluten-free flour blend and check your other ingredients for gluten content. 🏁 Conclusion
These Ultra Thick Bakery Style Chocolate Chip Cookies are the real deal — massive, gooey, golden, and outrageously delicious. With a perfect blend of crisp edges and soft centers, they deliver all the magic of a bakery cookie with none of the wait in line. Whether you’re gifting them, sharing with friends, or stashing them all for yourself (no judgment), one thing is guaranteed: they won’t last long. So preheat your oven, grab that butter and chocolate, and bake your way to cookie heaven.


Turned out so yummy!!
They spread way too much. Either it needs more flour or less sugar/fat. This is why I prefer recipes with weight measurements. They taste amazing, but they spread.
You have to let the dough cool like he said. He said preferably overnight. I did just that and they came out great. Fit 8 on one sheet
Oh. My. Goodness. Holy crappers, Batman. I will never use another recipe for chocolate chip cookies again. I highly recommend sea salt over regular salt. I chilled mine overnight in the fridge. Wow. I’m speechless, mainly because my mouth is full of yummy gooey cookie but that’s besides the point…
These are my favorite cookies! Thanks so much for this recipe.
This is the 3rd chocolate chip cookie recipe I have tried recently. It is by far my favorite! The flavor is excellent! I can’t wait to try the flavor variations.
Is 14TBS of butter a typo or did I misread it?
Nope, you read it right! 😊 It’s 14 tablespoons of butter — which is about 200 grams (or 1¾ sticks). 🍪 It seems like a lot, but that’s what gives these cookies their rich flavor, chewy centers, and those perfect crispy edges. Totally worth it! 🙌✨
Thank you! I was doing the math wrong on how many sticks I would need. This totally makes sense. Great recipe, best chocolate chip cookies I’ve ever made.
Could I make these with salted butter? If so, would I completely omit the salt in the recipe or cut it down to half or less?
I made this recipe, but I baked them longer than 14 min they weren’t browning at the edges and I didn’t want them to be raw. Not sure if them Being chilled makes a difference for the bake time.
I had the same issue, they were way under baked at 13 min. I think I baked mine for 17-18 because they were so cold. I def thinks that makes a difference especially if they are larger.
After the dough has chilled, and you’re ready to bake them, do you let the dough get to room temp before scooping and baking? I mean I’m assuming you would not be able to scoop them straight from taking them out from being chilled. And if we have to wait till the warm up, are there faster ways of warming them up without ruining the integrity of the cookie.